Bench Press
10x20kg
5x40kg
5x60kg
3x5x70kg
8x50kg
CGBP
2x8x40kg
Pull Ups
3x8xBW
5xBW
Seated Row
10x40kg
5x10x30kg

Tuesday, April 30, 2013
Saturday, April 27, 2013
Competition -- Iron Fest Open 2013
Despite having been unsuccessful in my last attempt at a water cut, I wound up giving it another shot for this comp. This time I drank about 6L water/day for a week before hand, and then cut out most fluid from about 10am yesterday. I did this because I realised that if I made it into the 66kg weight class, I'd make it into the top 10 ranked lifters of that weight class. My water cut was more successful than last time, but still not nearly enough to get me down to 66kg. So I weighed in at 67.5kg (I've been sitting around 70kg for the last couple weeks), and got straight into eating and rehydrating. Not making weight turned out to be a good thing, though. There was only one guy in the 66kg class, and I'm pretty sure he was stronger than me. There were four of us in the 74kg weight class, and it turns out I got the highest total. Consequently, I came home with some gold that I was not anticipating.
Videos were taken, although I don't have them on me, so I'll post them when I get them. In the meantime, here are my lifts, and some photos.


Videos were taken, although I don't have them on me, so I'll post them when I get them. In the meantime, here are my lifts, and some photos.
Squat
Warming up with 120kg
Opener
135kg
White lights. I started warming up about an hour before I should have, so once I got up to 120kg for a single, I tried to just maintain that. Ultimately, I went cold at some point. Still had the movement prepped, but needed to re-roll my left leg before opening. Consequently, my left side wasn't as solid on this lift, and it felt like my left hip did a dip on the way up.
Second Lift
142.5kg
PB lift. Felt much smoother/more stable than my opener.
Third Lift
150kg -- No lift
Got to ye olde sticking point and then the bar started disagreeing with me.
Bench Press
I think this is my third attempt
Opener
85kg -- No Lift
Technique was good. Touched chest, held it there, locked out. Shame I forgot to wait for the start signal, and thus disqualified the lift.
Second Lift
92.5kg
PB lift. Remembered to follow the rules. Felt good.
Third Lift
97.5kg -- No Lift
I felt that 100kg was a bit too ambitious, so decided to play it safe. Not safe enough, apparently. Like my third squat, I got to the sticking point and then my strength gave out.
Deadlift
I think this is my opener
Opener
150kg
Felt easier than my last warm up set (which was 140kg).
Second Lift
165kg
PB lift. I was pretty happy with this.
Third Lift
177.5kg
PB lift. After striking out on my third attempts of squat and bench press, I wasn't feeling as confident about my third attempt as I was to begin with. It was also getting late, and my drive wasn't what it had been earlier in the day (in the past, whenever I've done 1RM sessions I haven't had heaps of other guys training up to their maxes, too, which has meant getting it done in about 2 hours rather than 5, which has meant being more energetic by the end of it). Not trusting myself to give it all I've got when grinding becomes necessary, I opted for 177.5kg instead of 180kg. The weight pretty much flew up. Probably shouldn't gone 180kg after all.
I enjoy my gold medal. First time I've earned a medal for anything in my life.
Tuesday, April 23, 2013
Training -- Tue 23/04/2013
Foam Rolling -- Quads, ITB, TFL, Glutes, Hamstrings, Adductors
Squats
10xBW
10x20kg
5x60kg
3x80kg
3x100kg
1x120kg
5x130kg -- Rep PB :)
Bench Press
10x20kg
5x40kg
3x60kg
1x75kg
3x85kg
Deadlift
10x60kg
6x100kg
10x1x140kg -- Singles every minute on the minute.
And thus concludes my last session before comp this Saturday. Time for my body to relax.
In other news, I had a presentation today at uni on powerlifting. I had some videos prepared for the presentation but they didn't work. Nonetheless, I enjoyed myself, I felt I presented well, and I got a good Q&A session at the end.
Saturday, April 20, 2013
Training -- Sat 20/04/2013
7 days 'til competition! I'm excited!

Squats
10xBW
10x20kg
5x40kg
3x70kg
3x100kg
3x120kg
4x132.5kg
RDL
3x10x100kg -- Used straps for the first time and instantly realised how much work I haven't been doing with these. Will be strapping up more often.
Bench Press
10x20kg
5x35kg
3x50kg
3x60kg
3x70kg
3x80kg
2x90kg -- That's not 4. How odd.
Press
10x20kg
3x5x41kg
Pull Ups
8xBW
2x5x15kg
Seated Row
10x60kg
10x50kg
10x40kg
12x30kg
Wednesday, April 17, 2013
Training -- Wed 17/04/2013
I've been a bit sick the last couple days. Wot 2 do? Set PB's, that's what!
Front Squat
10xBW
10x20kg
5x40kg
3x60kg
3x70kg
3x80kg
Squats
3x100kg
3x115kg
1x125kg
1x32.5kg
1x140kg -- I wanted to get a triple. Instead, I got stuck halfway up the second rep. Not what I was aiming for.
Deadlift
10x70kg
4x100kg
2x120kg
2x140kg
3x160kg -- All time PB :)
GHR/Shrugs/Calf Raise
3x5xGreen/12x84kg/12x320lb
Training -- Tue 16/04/2013
Bench Press
10x20kg
5x35kg
3x50kg
3x60kg
3x70kg
3x80kg
2x3x90kg -- That's the stuff! If we want to be really technical about, this was 1x3 and 1x2 + 1 assisted, but the assistance on the last rep was so light that -- given that this is training, not competition -- I'll count it here. First set was a definite PB, though, all on my own.
4x80kg
8x60kg
CGBP
2x8x50kg
Assisted Pull Ups
15xGreen
2x12xOrange
Seated Row
8x60kg
3x10x50kg
I went bowling in the evening. That was fun. I was less terrible at it than expected, but don't let that fool you into thinking I didn't get the lowest game of the game.
Saturday, April 13, 2013
I Think About the Future Too Much
Competition's 2 weeks away, and I'm already thinking about what I'm going to do afterwards. I'm not planning anything particularly interesting for my lower body, other than that I'm thinking of getting some wrist straps and doing touch-n-go deadlifts once a week with a controlled eccentric. I've got some interesting ideas for upper body, though, which, if I proceed with this, will result in a lot of volume prior to peaking. Basically, I'll be broing out big time.
Bear in mind, 2 weeks from now I may already be bored with this idea and follow a different plan. Nonetheless, here's roughly what I'm thinking of for my upper body training:
Upper 1 (heavy bench/light press)
Bench Press 3x10 (or perhaps 1-2x5, 1-2x10)
Close Grip Bench Press 2x10
Incline Bench Press 2x10
OHP 3x10
Assisted Pull Ups 5x10-15
Seated Rows 5 sets
Upper 2 (heavy press/light bench)
OHP 3x5
Push Press 2x5 superset with BB Row 2 sets
DB Press 2x8-12 superset with 1-arm DB Row 2 sets
Bench Press 3x10
Weighted Pull Ups 3x5
Seated Row 3x15
Training -- 13/04/2013
Squats
2x10xBW
10x20kg
5x40kg
3x60kg
3x80kg
3x100kg
2x115kg
2x125kg
2x132.5kg
2x140kg -- I should have bought my camera. 2 reps with my old 1RM.
5x110kg
RDL
8x70kg
2x8x100kg
GHR/Calf Raise/Decline Sit Ups/Side Sit Ups
2x6xGreen/20x200lb/10/10
2x10xBW
10x20kg
5x40kg
3x60kg
3x80kg
3x100kg
2x115kg
2x125kg
2x132.5kg
2x140kg -- I should have bought my camera. 2 reps with my old 1RM.
5x110kg
RDL
8x70kg
2x8x100kg
GHR/Calf Raise/Decline Sit Ups/Side Sit Ups
2x6xGreen/20x200lb/10/10
Friday, April 12, 2013
Training -- Fri 12/04/2013
Bench Press
10x20kg
5x35kg
3x50kg
1x65kg
6x80kg
5x80kg -- Attempted 6th rep, hit sticking point. Not sure if I could have gotten through the sticking point, but after what felt like a couple seconds of not moving, I decided not to expend any further energy on the attempt.
10x60kg
Incline Bench Press
8x20kg
2x5x50kg
Press
10x20kg
5x41kg
2x3x41kg -- Too fatigued at this point. It happens.
Pull Ups
8xBW
3x4x15kg -- Loud exertional farts FTW.
Cable Row
10x60kg
12x50kg
15x40kg
4x15x30kg
10x20kg
5x35kg
3x50kg
1x65kg
6x80kg
5x80kg -- Attempted 6th rep, hit sticking point. Not sure if I could have gotten through the sticking point, but after what felt like a couple seconds of not moving, I decided not to expend any further energy on the attempt.
10x60kg
Incline Bench Press
8x20kg
2x5x50kg
Press
10x20kg
5x41kg
2x3x41kg -- Too fatigued at this point. It happens.
Pull Ups
8xBW
3x4x15kg -- Loud exertional farts FTW.
Cable Row
10x60kg
12x50kg
15x40kg
4x15x30kg
Thursday, April 11, 2013
A Man-to-Man Talk I'd Like to Have with my 16-Year-Old Self
Food is not bad, calories are not evil and the bench press is not special. Yes, the other 16-year-old boys are watching you and judging you. Get the **** over it. Worrying about what disapproving people think of you has only ever brought you harm, now is no different. You'll never have a great 6-pack unless you have lots of muscle to make a 6-pack out of, and you'll never have lots of muscle if you spend so much time being paranoid about gaining 1g of fat. You don't have to lift to failure, you do have to lift progressively, if you aren't progressing reduce the weight and work on technique. Lack of soreness is not a bad thing, and you don't need to change your program every month to prevent a plateau. Being constantly hungry is not a sign of health. Eat good food, and lots of it. You're not 7 any more, so stop limiting yourself to the amounts of food you ate as a 7-year-old. Above all of this, your size and strength has no bearing on your value as a human being. Getting bigger and stronger will not make you feel better about yourself. It won't make you like you, and it won't make others like you. This is good for you, this is one of the best things you'll ever do for yourself (although there are a few things you'll do for yourself that will be even better), but it won't fix your emotional problems any more than a band-aid will cure cancer. You want to fix yourself? Say hi to people. There are a thousand students at your school. Say hi to someone new every day. Listen to people. You think you're so smart, you think you're right all the time. You're wrong. About most things, most of the time, you're wrong. That's not because you're young, that's because you exist. There is more information out there than you'll ever know, and most of it is wrong. The amount of information available to mankind is growing exponentially, and most of it is wrong. You have a lot of experience ahead of you. The experience that shines light on what you know will make you confident, but the experience that allows you to appreciate how much you don't know and how much the stuff you think you know warrants correction will make you both humble and confident, and that will give you a strength that no amount of lifting will ever provide. But don't stop lifting. Lifting is awesome. You love it now, and you're going to love it even more in time. Listen to your body and love yourself. Trust in God, know that He uses your pain and suffering to grow you into who you'll be for eternity, and no matter how badly the **** hits the fan (and trust me, it will hit the fan, badly), you'll be alright.
Wednesday, April 10, 2013
Training -- Wed 10/04/2013
Front Squat
10xBW
10x20kg
5x40kg
3x60kg
3x70kg
3x80kg
2x90kg
Paused Squat
5x95kg
4x110kg
2x125kg +1 unpaused squat
5x125kg unpaused -- rep PB for regular back squats.
Deadlift
10x60kg
6x80kg
4x100kg
2x120kg
2x140kg
2x3x155kg -- Rep PB :)
GHR/Calf Raise/Barbell Shrug
5xGreen/8x360lb/15x20kg
5xGreen/8x360lb/10x70kg
3x5xGreen/8x360lb/10x80kg
Side Raise/Decline Sit Ups
2x10/10
Wearing glasses while deadlifting makes you a smarter lifter.
True story.
Tuesday, April 9, 2013
Training -- Tue 09/04/2013
Bench Press
10x20kg
5x35kg
5x50kg
2x60kg
2x70kg
2x80kg
2x90kg -- Second rep was better than the first rep. Actually, that seemed to be true of most sets done today. I attempted a third rep but a long struggle with it did not end with me locking it out on my own. Nonetheless, the heaviest I've ever successfully lifted is 1x90kg with an epic bounce of the chest, so 2x90kg with a quick pause on the chest is an all-time PB. That seems to be something worth being happy with.
2x85kg
3x80kg
4x75kg
CGBP
10x55kg
8x55kg
Pull Ups
8xBW
3x3x15kg
Cable Row
4x12x50kg
Sunday, April 7, 2013
Pyramid Workouts

Basic programming tends to use "sets across," in which you select a weight and then try to use the same amount of reps at that weight across multiple sets (eg 3x10x100kg). In pyramid workouts, however, you use multiple working weights, and as such multiple rep ranges. The three primary forms of pyramid workout are:
1. Pyramid up (classic pyramid)
2. Pyramid down (reverse pyramid)
2. Pyramid up and down (full pyramid)
Pyramid up (classic pyramid)
In the classic pyramid, you will begin the workout with a weight that allows you to use relatively high reps. With each additional set, you will add some weight and decrease the amount of reps performed. An example of this would be: 10x100kg, 8x10⁵kg, 6x110kg, 4x115kg, 2x120kg.
Pyramid down (reverse pyramid)
In the reverse pyramid, you will begin the workout with a weight that allows you to perform very few reps. With each additional set, will take some weight off and increase the amount of reps performed. An example of this would be: 2x140kg, 3x130kg, 5x120kg, 6x110kg, 10x100kg.
Pyramid up and down (full pyramid)
In the full pyramid, you will begin the workout with a weight that allows you to use relatively high reps. With each additional set, you will add some weight and decrease the amount of reps performed until you reach a target weight or rep range. You will then reverse pyramid back down to lighter weights and higher reps. And example of this would be: 10x100kg, 8x10⁵kg, 6x110kg, 4x115kg, 2x120kg, 3x110kg, 5x100kg, 12x90kg.
Why would I do pyramids?
From what I've read, the classic pyramid isn't very effective for maximal strength or athletic training, because each set accumulates fatigue, limiting performance as the weights increase (so, you get to sets where you can only do 1-3 reps of the exercise, but with a weight that's closer to your 5-8RM). However, it's my understanding that (for reasons that, ironically, I don't understand) this method can be rather productive for building muscle mass.
The reverse pyramid seems to be a little more productive for max strength training, because the heaviest sets can be performed properly. The additional sets with lighter weights then allow the lifter to build up a higher amount of volume, which may be useful for practicing technique and promoting hypertrophy.
For the same reasons that classic pyramids aren't usually ideal for max strength, full pyramids aren't, either. However, like reverse pyramids, full pyramids do allow the lifter to practice technique and accumulate more volume, which is again good for hypertrophy.
Another benefit to pyramid training is that since it allows you to work at different loads and in different rep ranges, different motor recruitment patterns can be utilised, different muscle fibres fatigued, and different energy pathways activated, providing the lifter with a broader scope for progress.
Saturday, April 6, 2013
Training -- Sat 06/04/2013
Squat day, squat day, gotta get down on squat day. But then get up again, or else you missed. I widened my hand placement while squatting today, in order to alleviate the stress on my left shoulder. I might keep my hands out a bit wider than I'm used to for the time being. This is seeming like a sensible option.
Squats
10xBW
10x20kg
5x40kg
3x60kg
3x80kg
3x100kg
3x115kg
3x125kg
2x3x132.5kg -- First set on film. Looks like I probably could have gotten 4 or 5 reps.
5x120kg
20x90kg -- Also on film.
RDL
8x70kg
3x10x92.5kg
GHR/Calf Raise/Side Raise/Decline Sit Ups
3x8xD.Blue/12x340lb/10/10
I finished up with my shoulder rehab work and and lower body stretching and foam rolling.
Squats
10xBW
10x20kg
5x40kg
3x60kg
3x80kg
3x100kg
3x115kg
3x125kg
2x3x132.5kg -- First set on film. Looks like I probably could have gotten 4 or 5 reps.
5x120kg
20x90kg -- Also on film.
3x132.5kg
20x90kg
RDL
8x70kg
3x10x92.5kg
GHR/Calf Raise/Side Raise/Decline Sit Ups
3x8xD.Blue/12x340lb/10/10
I finished up with my shoulder rehab work and and lower body stretching and foam rolling.
Friday, April 5, 2013
Training -- Fri 05/04/2013
Bench Press
10x20kg
5x35kg
3x50kg
1x65kg
2x3x75kg
Press
10x20kg
5x5x40kg
Pendlay Row
10x30kg
4x10x40kg -- These didn't suddenly become magic for me, they still suffer from all the drawbacks that result in me not normally using them, but my shoulders became happier with me set after set.
Fat Gripz Row
4x15x40kg
10x20kg
5x35kg
3x50kg
1x65kg
2x3x75kg
Press
10x20kg
5x5x40kg
Pendlay Row
10x30kg
4x10x40kg -- These didn't suddenly become magic for me, they still suffer from all the drawbacks that result in me not normally using them, but my shoulders became happier with me set after set.
Fat Gripz Row
4x15x40kg
Thursday, April 4, 2013
Learning to Squat -- Part 2: Fun With Barbells
There are a lot of ways to squat with a barbell. A lot. Like, a really big amount. Barbells are versatile equipment, and squats are a versatile exercise. So I'm only going to cover a few different kinds of squat.
For the sake of brevity (and making it easier to learn if you're building on my previous post), we'll continue with the same stance. This alone culls a lot of different squat variations which use a wider stance, narrower stance, staggered stance and even one leg off the floor entirely.
So, the same technique points covered in body weight squats apply with barbell squats:
- Set heels shoulder-width apart and turn toes out slightly.- Lift chest and contract abs.- Look straight ahead.- Spread the floor with your feet and push your knees out throughout the movement.- Keep your tailbone lifted.- Sit down onto the air between your legs and then come back up by driving your heels down and chest up.
Front Squats
There are two main ways to do the front squat: the Olympic style and the crossover style.
In the Olympic style, you will set your hands just outside of shoulder width on the bar. You'll want to set the bar so that it's held up by the deltoids, with the fingers lightly supporting. Some people can get all four fingers on the bar, but most will only be good for two or three fingers, depending on flexibility and individual anthropometry. Your elbows should be pointing straight ahead, with your arms roughly parallel to the ground and parallel to each other. You don't want to choke on the bar, but you do still want your elbows to be up high.
A common mistake in this style of front squat is to try and grip the bar in your palms. Remember, you only want your fingers touching the bar, and they're only there for a bit of support.

The crossover style is convenient for those who lack the forearm flexibility to use the Olympic style front squat. In this method, you'll still point your elbows up and forward, but instead of having your fingers outside the shoulders, you'll cross your left hand over onto your right shoulder, and your right hand over onto your left shoulder.

In both variations, begin with the barbell in the squat rack. The rack should be set so that the bar is at about mid-chest height. People often set the bar too high in the rack, which results in having to calf raise their way in and out of the rack. Not a big deal with light weights, but when the weights get heavy, this can result in some brilliantly failtastic experiences.
Step up to the rack and set your feet so that you can stand straight up with the bar (due to the weight of the bar, if your feet aren't set up right you'll either move forwards or move backwards when you unrack the bar). Set the bar evenly across the front of the shoulders, lift your chest, take a deep breath, brace your whole body and stand up straight. Take a couple steps back (don't go for a walk with the bar if you don't have to), make sure your feet are properly set (shoulder width apart, toes slightly out, one foot isn't further forward than the other), and squat.
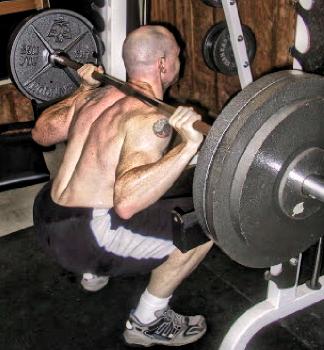
Having a weight loaded onto the front of the body has some interesting effects. It changes the centre of gravity so that to prevent yourself from falling forwards (or dumping the bar forwards), you'll have to remain a little more upright than in body weight squats. The consequence of your torso remaining upright is that your hips won't drift far back, which means your knees will have to go further forwards if you're to hit full depth, which means your calves will be in for more of a stretch than other squats would provide. Some calf stretches (as well as some calf raises to strengthen the new-found ROM) may be in order here, although another option is to have your heels elevated. In the coloured picture above, the Olympic lifter is wearing Olympic weightlifting shoes, which set the heels about an inch higher than the toes. In the black and white photo, the lifter has his heels elevated on a thin block. By decreasing the distance that the hips drift and increasing the distance that the knees drift, emphasis is taken out of the hips and into the quadriceps.
Technique points (beyond those of body weight squats):
- Hands evenly placed.
- Elbows up.
- Bar resting on anterior deltoids.
- If using Olympic style, fingers just touching the bar rather than gripping it.
- Don't choke.
Back Squats
Just as there's more than one way to do a front squat, there's more than one way to do a back squat. Here are some of the variables you can play with:
1. Bar placement
2. Hand placement
3. Type of grip
Bar placement
So, there are two bar placements that I'm qualified to speak about. The first is the high bar or Olympic bar placement. This is up on the upper trapezius, just below the big bone at the base of your neck. This bar placement is conducive to a relatively upright torso position (although not as upright as the front squat), which is why Olympic lifters tend to use it -- it has good carry-over to their front squats and competition lifts. I've found it good to squeeze my shoulder blades back and very slightly up to get a good shelf with my upper trapezius for this variation. This position is generally easy on the shoulder joint, but can make the upper trapezius very sore, especially if it's your first time.
High bar squat
The second bar placement I can talk about is typically referred to as a low bar position, however, in light of the placement I can't talk about beyond a theoretical analysis (and experience beyond theory is important for this type of discussion, thus why I consider myself unqualified to discuss that kind of low bar squat), this is perhaps more accurately described as a mid bar squat. This position sits the bar across the top of the posterior deltoids. It's not as friendly on the shoulder joint as the high bar squat, but it does provide greater stability (assuming you've got decent posterior deltoids to tighten up and make a solid shelf). Having the bar lower on the back tilts the torso further forward in order to maintain proper balance, which increases ROM at the hips and results in more glute and hamstring work. Many people approach high and low bar squatting with completely different techniques, which is fine. Some think this is required (I used to be one of them), which isn't correct.

The version of low bar squatting that I'm not qualified to talk about sits the bar (if my understanding is correct, which it probably isn't) in the groove between the deltoids and the triceps. Again, this causes a further forward tilt, more hip flexion, and greater glute and hamstring work. I've observed lifters having more difficulty fully extending their hips at the top of the squat using this technique. I couldn't tell you how it feels or what it's like trying to become proficient in this method. From what I've observed, this technique is mostly only used by powerlifters, and (if I recall correctly) some powerlifting federations don't allow it in competition.
Whatever the bar placement, at heavy weights the lifter will always want to keep the bar over the middle of the foot, or else s/he can expect to fail. And get laughed at.
Hah!
Hand placement
Hand placement is related to bar placement, in that the higher the bar, generally the closer the hands can comfortably be, thanks to these things in our forearms called bones (same reason why the further back the hips go, the less the knees will come forwards, and the more the knees come forwards, the less the hips will travel back).
As a general rule, you should aim to have your hands as close together as you can comfortably get them. The closer they are, the closer you can keep your elbows to your back. The closer your elbows are to your back, the tighter you can squeeze your trapezius and deltoids, making a tighter shelf for the bar to sit in, making the bar more stable. In saying that, what's appropriately close for me may be too close for you, or may be too far out and cause a loose shelf.
There are various competitive lifters who have their hands out as far as they can go on the bar. I'm not sure if it's because this is still as close as they can bring their hands, or if they have a different reason for having their hands out that far. If you're curious, you could always try asking them.
Wherever you put your hands, set them evenly on the bar, unless you have unusual bodily issues that require you to do otherwise.
Grip type
You've basically got two options here: thumbs around or thumbs over. Thumbs around makes use of your opposable digits, thumbs over treats your thumbs like fingers. I use thumbs over, many people use thumbs around. I used to think that this was a really important thing, but I'm progressively becoming less convinced that this is the case. What I think really matters is that you aim to keep your wrists straight, pull the bar into your back, and grip the bar tightly.
Technique points (beyond those of body weight squats):
- Hands evenly placed.
- Make a solid shelf by squeezing your shoulders together.
- Pull elbows into sides.
- Pull bar into back.
- Squeeze bar tightly.
Notes on breathing
With body weight squats, it's not particularly important that you breathe any particular way, so long as you do in fact breathe. With barbell squats, breathing becomes more important. There are two methods you could use, depending on health status and goals.
The first method is to breathe in the eccentric (while you're squatting down) and out on the concentric (while you're standing up). This is fine when the weights aren't too intense. But, when you're using heavy weights, this method won't suffice.
For heavy lifting, provided it's medically okay to do so (some conditions, such as hypertension, make this risky), take a deep breath in at the top and hold it throughout the set. The act of holding a deep breath will increase intra-abdominal pressure, which in turn will help you to brace harder through the core and get your through sticking points. Exhale at the top, and take another deep breath at the start of each rep.
If you use a lifting belt, you'll want to hold your breathe during each rep. The belt works by having the abs pushed out against it, which happens while you hold a deep breath. Exhaling will generally result in the pressure against the belt decreasing, reducing the belt's support.
Learning to Squat -- Part 1: Body Weight Squats
Most people, if asked to squat on their first day in the gym, will not feel comfortable with it, and their attempts to squat will be rather ugly. There are a few generic reasons why untrained novices suck at this movement:
1. They may lack the strength to squat.
2. They may lack the flexibility to squat.
3. They may lack the coordination/balance to squat.
4. They may lack the confidence to squat.
Most people, starting out, probably do lack the confidence. Often, they'll lack the confidence because they believe that they lack the flexibility and balance to squat, and they'll confirm this belief when they attempt to squat and can't get all the way down and up again in a fluid movement. However, in my experience, it's very often a case of low confidence preventing them from moving naturally. They don't trust that they can do the movement, so they overthink the movement and throw a large dose of inhibitions in the way, preventing themselves from going down properly, thus removing any possibility of coming up properly, either.
There are several paths around this. The path that I used (unintentionally, because I was taught that going below 90 degrees at the knees is bad) was deep leg presses and partial squats. When I finally decided to start squatting to parallel, I had developed enough body awareness and confidence that it was an easy transition. If you're not in a hurry to learn parallel squats, this is a viable option, and if the first reason not to do full squats (that you lack the strength for it) is true, then it may even be a necessity.

If you do want to get on with learning deeper squats, then here's a much quicker method I developed after watching a Dan John seminar back in the day.
Wall Squat Drill
- Stand against a wall, facing away.
- Set your feet so that the back of your heels are about in line with the front of your pelvis, and are shoulder-width apart. Turn your feet out, each 15-45 degrees from parallel (30-90 degrees from each other).
- Slide down the wall as far as you can while keeping your hips and shoulders against the wall. Keep your knees out, pointing in the same direction as your toes.
- When you get to the bottom, spend some time down there holding that position (this will require you to activate your leg muscles), getting used to that depth. It will probably feel uncomfortable as your thigh muscles are simultaneously stretched and contracted, and you'll likely feel a lot of lactic acid accumulating in your quadriceps rather quickly. Keeping your hips and shoulders against the wall may also result in you activating your glutes and trunk muscles, which you'll need when it comes to actually squatting.
- Stand up out of that position. Get someone to give you a hand up if needed.
It may seem like I've just described a typical wall squat, but not quite. Typical wall squats have your feet way out in front, so that you end up with 90 degree angles at the hips and knees. Instead, I'm recommending that your feet be closer to the wall so that your knees have to move out over the toes and your glutes come down towards your heels.
If you can do the above drill, then you definitely have the flexibility in most muscles to squat. Calf flexibility might be an issue, but other than that, the ROM's there. Standing back up will also demonstrate the required strength, and getting used to the position will develop some coordination and confidence. Do the above wall drill a few times, then, once you're confident with it, make the following adjustment:
Wall Squat to Air Squat Drill
- Once set at the bottom, push yourself forward so that your weight is over your feet, rather than locked between your feet and the wall.
- Set your posture by lifting your bum slightly (actually, thinking of lifting your tailbone might be a better cue) and lifting your chest. I find it easiest to make use of this position by putting my hands out in front, which allows me to be a little more upright.
- Once you've established your posture at the bottom, stand straight up.

Voila, you've now learned how to do body weight squats. Other methods, like the one I used that enabled me to do my first parallel squats, can take a long time to get you doing full squats. But with this method I've managed to teach several people (who watched me demonstrate squats and said: "I can't do that") to do full ROM body weight squats in a matter of minutes.
I suspect that what makes this method work is that we're generally confident with standing, but not so much with being at (or getting down into) the bottom of a squat. By sliding down a wall, we get into that bottom position with support behind us the whole way. Once we move forward from the wall, we're in the bottom position of a squat. By standing up straight from there, we learn the path between the bottom of the squat and standing upright, and so it's mentally much easier to trek back and forth along that path. That's my theory, anyway.
Once you've got that up and down path figured out, it's now time to start thinking about technique points.
Body Weight Squat Technique Points
- Set heels shoulder-width apart and turn toes out slightly.
- Lift chest and contract abs.
- Look straight ahead.
- Spread the floor with your feet and push your knees out throughout the movement.
- Keep your tailbone lifted.
- Sit down onto the air between your legs and then come back up by driving your heels down and chest up.
A lot of sources say to begin the squat by breaking (unlocking) first at the hips, then at the knees, and sit back. In my experience and observations, this appears to work well for sumo squatters with good body awareness. For beginners with a narrower stance (as I'm teaching here) this seems to result more in lower back/pelvic rounding, which is something we want to resist. So, for now at least, just go up and down, sitting between your legs.
Alongside body weight squats, it can help to do goblet squats. Goblet squats are traditionally a kettlebell exercise, but can be done with a dumbbell, or even without weight (making them just a specific way of doing body weight squats). In the goblet squat, you take a weight (real or imaginary) and hold it to your chest with both hands, keeping your elbows in against your sides. At the bottom of the goblet squat, your elbows should brush against your inner thighs, which helps to cue keeping the knees out. Goblet squats can also help with learning to keep your chest up.

Now that you're getting up and down and developing technique, it's time to accumulate a lot of reps. How many? Well, "they" say that it takes 300-500 repetitions of a new exercise performed well to ingrain the technique, and 3,000-5,000 repetitions to fix a bad motor pattern. So, I won't prescribe a specific amount of sets and reps to do in each session, but I will say that you should be emphasising technique. You might only be doing 5x5 in your first session, despite possibly having the strength and endurance to do much more. Use technique as a gauge to determine whether you should continue the set you're on or rest for a minute before doing it again.
Over time, build up to being able to do 3x20 with consistent technique. Early on, you'll find yourself struggling with all the technique points to focus on. Chest up! Tailbone up! Knees out! Spread the floor! Drive through your heels! Abs tight! It's a lot to take in (remember, goblet squats may make some of these cues easier to cover). The need to think is one of the more frustrating parts of being a beginner. Persevere, and in time you'll reach a point where you don't have to think as much about what you're doing and how you're doing it. This is the first level of mastery, and you want to reach it before you start using barbells or squatting to failure. It's wise to achieve this level before adding intensity to your squats (through heavy loads and approaching failure), because there's additional technique in how to position the barbell (so you want to get the general movement down before you add even more stuff to think about), and technique starts to break down towards failure (so if you get into the habit of approaching failure before you're ready for it, you're more likely to develop bad technique habits).
As a programming point, I would like to see people achieve 3x20 good body weight squats on 5 separate training sessions before they touch a barbell. This may seem like an overly conservative approach, but I'd really like to see people develop a solid foundation before they go making things harder for themselves. Those 5 sessions should be close together -- I'm talking a period of 1-2 weeks. I've never enforced this before with anyone I've trained, but looking at the struggles people tend to have once the barbell gets added into the mix, it's something I would like to trial with any future beginners I work with. In theory at least, 3x20 across 5 close sessions demonstrates that technique is pretty well locked in. At this stage, it should be on the verge of second nature to set your feet up, lift your chest, sit down between your legs, drive your knees out and keep your bum lifted. The frustration of trying to get it right shouldn't be there anymore. Furthermore, by doing it over 5 sessions, the 300 reps to ingrain technique are being covered (on top of all the reps it took to get to that stage). And if you can do 3x20 and be good to go 1 or 2 days later, it shows that you have the strength to handle an empty barbell on your shoulders. So then, it's time for the next chapter in your lifting journey.
1. They may lack the strength to squat.
2. They may lack the flexibility to squat.
3. They may lack the coordination/balance to squat.
4. They may lack the confidence to squat.
Most people, starting out, probably do lack the confidence. Often, they'll lack the confidence because they believe that they lack the flexibility and balance to squat, and they'll confirm this belief when they attempt to squat and can't get all the way down and up again in a fluid movement. However, in my experience, it's very often a case of low confidence preventing them from moving naturally. They don't trust that they can do the movement, so they overthink the movement and throw a large dose of inhibitions in the way, preventing themselves from going down properly, thus removing any possibility of coming up properly, either.
There are several paths around this. The path that I used (unintentionally, because I was taught that going below 90 degrees at the knees is bad) was deep leg presses and partial squats. When I finally decided to start squatting to parallel, I had developed enough body awareness and confidence that it was an easy transition. If you're not in a hurry to learn parallel squats, this is a viable option, and if the first reason not to do full squats (that you lack the strength for it) is true, then it may even be a necessity.
Coach Mark Rippetoe teaches a useful method of leg pressing
for someone who wants to learn to squat.
Yep. This was me.
If you do want to get on with learning deeper squats, then here's a much quicker method I developed after watching a Dan John seminar back in the day.
Wall Squat Drill
- Stand against a wall, facing away.
- Set your feet so that the back of your heels are about in line with the front of your pelvis, and are shoulder-width apart. Turn your feet out, each 15-45 degrees from parallel (30-90 degrees from each other).
- Slide down the wall as far as you can while keeping your hips and shoulders against the wall. Keep your knees out, pointing in the same direction as your toes.
- When you get to the bottom, spend some time down there holding that position (this will require you to activate your leg muscles), getting used to that depth. It will probably feel uncomfortable as your thigh muscles are simultaneously stretched and contracted, and you'll likely feel a lot of lactic acid accumulating in your quadriceps rather quickly. Keeping your hips and shoulders against the wall may also result in you activating your glutes and trunk muscles, which you'll need when it comes to actually squatting.
- Stand up out of that position. Get someone to give you a hand up if needed.
It may seem like I've just described a typical wall squat, but not quite. Typical wall squats have your feet way out in front, so that you end up with 90 degree angles at the hips and knees. Instead, I'm recommending that your feet be closer to the wall so that your knees have to move out over the toes and your glutes come down towards your heels.
If you can do the above drill, then you definitely have the flexibility in most muscles to squat. Calf flexibility might be an issue, but other than that, the ROM's there. Standing back up will also demonstrate the required strength, and getting used to the position will develop some coordination and confidence. Do the above wall drill a few times, then, once you're confident with it, make the following adjustment:
Wall Squat to Air Squat Drill
- Once set at the bottom, push yourself forward so that your weight is over your feet, rather than locked between your feet and the wall.
- Set your posture by lifting your bum slightly (actually, thinking of lifting your tailbone might be a better cue) and lifting your chest. I find it easiest to make use of this position by putting my hands out in front, which allows me to be a little more upright.
- Once you've established your posture at the bottom, stand straight up.
When you perform air squats, always remember to be pretty.
Voila, you've now learned how to do body weight squats. Other methods, like the one I used that enabled me to do my first parallel squats, can take a long time to get you doing full squats. But with this method I've managed to teach several people (who watched me demonstrate squats and said: "I can't do that") to do full ROM body weight squats in a matter of minutes.
I suspect that what makes this method work is that we're generally confident with standing, but not so much with being at (or getting down into) the bottom of a squat. By sliding down a wall, we get into that bottom position with support behind us the whole way. Once we move forward from the wall, we're in the bottom position of a squat. By standing up straight from there, we learn the path between the bottom of the squat and standing upright, and so it's mentally much easier to trek back and forth along that path. That's my theory, anyway.
Once you've got that up and down path figured out, it's now time to start thinking about technique points.
Body Weight Squat Technique Points
- Set heels shoulder-width apart and turn toes out slightly.
- Lift chest and contract abs.
- Look straight ahead.
- Spread the floor with your feet and push your knees out throughout the movement.
- Keep your tailbone lifted.
- Sit down onto the air between your legs and then come back up by driving your heels down and chest up.
A lot of sources say to begin the squat by breaking (unlocking) first at the hips, then at the knees, and sit back. In my experience and observations, this appears to work well for sumo squatters with good body awareness. For beginners with a narrower stance (as I'm teaching here) this seems to result more in lower back/pelvic rounding, which is something we want to resist. So, for now at least, just go up and down, sitting between your legs.
Alongside body weight squats, it can help to do goblet squats. Goblet squats are traditionally a kettlebell exercise, but can be done with a dumbbell, or even without weight (making them just a specific way of doing body weight squats). In the goblet squat, you take a weight (real or imaginary) and hold it to your chest with both hands, keeping your elbows in against your sides. At the bottom of the goblet squat, your elbows should brush against your inner thighs, which helps to cue keeping the knees out. Goblet squats can also help with learning to keep your chest up.
Goblet Squats
Now that you're getting up and down and developing technique, it's time to accumulate a lot of reps. How many? Well, "they" say that it takes 300-500 repetitions of a new exercise performed well to ingrain the technique, and 3,000-5,000 repetitions to fix a bad motor pattern. So, I won't prescribe a specific amount of sets and reps to do in each session, but I will say that you should be emphasising technique. You might only be doing 5x5 in your first session, despite possibly having the strength and endurance to do much more. Use technique as a gauge to determine whether you should continue the set you're on or rest for a minute before doing it again.
Over time, build up to being able to do 3x20 with consistent technique. Early on, you'll find yourself struggling with all the technique points to focus on. Chest up! Tailbone up! Knees out! Spread the floor! Drive through your heels! Abs tight! It's a lot to take in (remember, goblet squats may make some of these cues easier to cover). The need to think is one of the more frustrating parts of being a beginner. Persevere, and in time you'll reach a point where you don't have to think as much about what you're doing and how you're doing it. This is the first level of mastery, and you want to reach it before you start using barbells or squatting to failure. It's wise to achieve this level before adding intensity to your squats (through heavy loads and approaching failure), because there's additional technique in how to position the barbell (so you want to get the general movement down before you add even more stuff to think about), and technique starts to break down towards failure (so if you get into the habit of approaching failure before you're ready for it, you're more likely to develop bad technique habits).
Coach Nick Horton discusses the first level of mastery.
As a programming point, I would like to see people achieve 3x20 good body weight squats on 5 separate training sessions before they touch a barbell. This may seem like an overly conservative approach, but I'd really like to see people develop a solid foundation before they go making things harder for themselves. Those 5 sessions should be close together -- I'm talking a period of 1-2 weeks. I've never enforced this before with anyone I've trained, but looking at the struggles people tend to have once the barbell gets added into the mix, it's something I would like to trial with any future beginners I work with. In theory at least, 3x20 across 5 close sessions demonstrates that technique is pretty well locked in. At this stage, it should be on the verge of second nature to set your feet up, lift your chest, sit down between your legs, drive your knees out and keep your bum lifted. The frustration of trying to get it right shouldn't be there anymore. Furthermore, by doing it over 5 sessions, the 300 reps to ingrain technique are being covered (on top of all the reps it took to get to that stage). And if you can do 3x20 and be good to go 1 or 2 days later, it shows that you have the strength to handle an empty barbell on your shoulders. So then, it's time for the next chapter in your lifting journey.
Wednesday, April 3, 2013
Training -- Wed 03/04/2013
Front Squats
10xBW
10x20kg
5x40kg
3x60kg
3x70kg
3x80kg
3x87.5kg
Pause Squats
6x87.5kg
5x87.5kg -- I somehow forgot to increase the weight like I was supposed to, and didn't notice until after the set was finished.
5x95kg
4x102.5kg
3x110kg
2x3x117.5kg -- I didn't think I had this in me. Pleasant surprise.
Deadlifts
10x60kg
5x80kg
4x100kg -- I decided to do mixed grip, alternating which hand I was using each rep. I followed through with that on the remaining warm ups.
2x120kg
2x140kg
2x155kg -- Left over, right under. Attempted a third rep, bar got about and inch off the floor and then stopped agreeing with me. Stupid bar.
1x155kg -- Right over, left under. Got the bar almost to my knee on what would have been a second rep, and again the bar disagreed with me. Loud profanities were heard by all. At this point, I stripped the weight back to 100kg, and spent the next 20 minutes in what can best be described as a profoundly middle class rage. To understand what I mean by middle class rage, let me reflect this over to middle class humour, in which the joke is responded to with a polite chuckle that says: "Ah, yes, I see what you did there." So, I was raging at the bar, but in the mildest manner.
3x100kg -- Back to DOH hook grip here on out.
3x110kg
3x120kg
3x130kg
2x140kg
2x150kg -- Louder profanities were heard. I really wanted 3 reps. I think I got the bar the furthest up my leg out of all failed sets, but it still never passed my knees. I'll beat you next time.
I'm rock climbing tonight. I hear that for rock climbing, it's beneficial to have your legs and grip muscles in good order. This might be hilarious.
Tuesday, April 2, 2013
Training -- Tue 02/04/2013
Bench Press
10x20kg
5x35kg
3x50kg
1x65kg
1x75kg
2x3x85kg
5x75kg
12x55kg
CGBP
2x8x50kg
Pull Ups
4x8xBW
Rows
5x12x40kg
Biceps Triset/Dips
2x10⁻¹⁰-10x5kg/5xBW
And as always, lots and lots of stuff to add a smile to my shoulder's dial.
10x20kg
5x35kg
3x50kg
1x65kg
1x75kg
2x3x85kg
5x75kg
12x55kg
CGBP
2x8x50kg
Pull Ups
4x8xBW
Rows
5x12x40kg
Biceps Triset/Dips
2x10⁻¹⁰-10x5kg/5xBW
And as always, lots and lots of stuff to add a smile to my shoulder's dial.
Subscribe to:
Posts (Atom)